Build Your First Workflow
In this tutorial, you'll build and run your first Temporal application. You'll understand the core building blocks of Temporal and learn how Temporal helps you build crash proof applications through durable execution.
Introduction
Prerequisites
Before starting this tutorial:
- Set up a local development environment for developing Temporal applications
- Ensure you have Git installed to clone the project
Quickstart Guide
Run through the Quickstart to get your set up complete.
What You'll Build
You’ll build a basic money transfer app from the ground up, learning how to handle essential transactions like deposits, withdrawals, and refunds using Temporal.
Why This Application?: Most applications require multiple coordinated steps - processing payments, sending emails, updating databases. This tutorial uses money transfers to demonstrate how Temporal ensures these multi-step processes complete reliably, resuming exactly where they left off even after any failure.
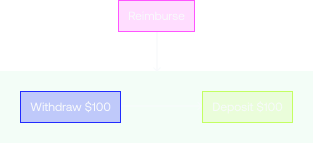
In this sample application, money comes out of one account and goes into another. However, there are a few things that can go wrong with this process. If the withdrawal fails, then there is no need to try to make a deposit. But if the withdrawal succeeds, but the deposit fails, then the money needs to go back to the original account.
One of Temporal's most important features is its ability to maintain the application state when something fails. When failures happen, Temporal recovers processes where they left off or rolls them back correctly. This allows you to focus on business logic, instead of writing application code to recover from failure.
Download the example application
The application you'll use in this tutorial is available in a GitHub repository.
Open a new terminal window and use git to clone the repository, then change to the project directory.
Now that you've downloaded the project, let's dive into the code.
git clone https://github.com/temporalio/money-transfer-project-template-go
cd money-transfer-project-template-go
git clone https://github.com/temporalio/money-transfer-project-java
cd money-transfer-project-java
git clone https://github.com/temporalio/money-transfer-project-template-python
cd money-transfer-project-template-python
git clone https://github.com/temporalio/money-transfer-project-template-ts
cd money-transfer-project-template-ts
git clone https://github.com/temporalio/money-transfer-project-template-php
cd money-transfer-project-template-php
composer install
git clone https://github.com/temporalio/money-transfer-project-template-dotnet
cd money-transfer-temporal-template-dotnet
git clone https://github.com/temporalio/money-transfer-project-template-ruby
cd money-transfer-project-template-ruby
The repository for this tutorial is a GitHub Template repository, which means you could clone it to your own account and use it as the foundation for your own Temporal application.
Let's Recap: Temporal's Application Structure
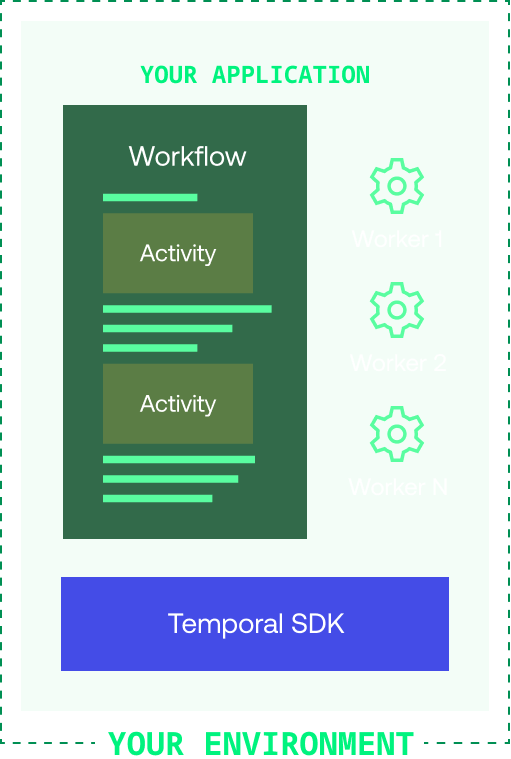
The Temporal Application will consist of the following pieces:
- A Workflow written in your programming language of choice and your installed Temporal SDK in that language. A Workflow defines the overall flow of the application.
- An Activity is a function or method that does specific operation - like withdrawing money, sending an email, or calling an API. Since these operations often depend on external services that can be unreliable, Temporal automatically retries Activities when they fail. In this application, you'll write Activities for withdraw, deposit, and refund operations.
- A Worker, provided by the Temporal SDK, which runs your Workflow and Activities reliably and consistently.
What You'll Build and Run
The project in this tutorial mimics a "money transfer" application. It is implemented with a single Workflow, which orchestrates the execution of three Activities (Withdraw, Deposit, and Refund) that move money between the accounts.
To perform a money transfer, you will do the following:
-
Launch a Worker: Since a Worker is responsible for executing the Workflow and Activity code, at least one Worker must be running for the money transfer to make progress.
-
Submit a Workflow Execution request to the Temporal Service: After the Worker communicates with the Temporal Service, the Worker will begin executing the Workflow and Activity code. It reports the results to the Temporal Service, which tracks the progress of the Workflow Execution.
None of your application code runs on the Temporal Server. Your Worker, Workflow, and Activity run on your infrastructure, along with the rest of your applications.
Step 1: Build your Workflow and Activities
Workflow Definition
A Workflow Definition in Python uses the @workflow.defn decorator on the Workflow class to identify a Workflow.
This is what the Workflow Definition looks like for this kind of process:
workflows.py
from datetime import timedelta
from temporalio import workflow
from temporalio.common import RetryPolicy
from temporalio.exceptions import ActivityError

with workflow.unsafe.imports_passed_through():
    from activities import BankingActivities
    from shared import PaymentDetails

@workflow.defn
class MoneyTransfer:
    @workflow.run
    async def run(self, payment_details: PaymentDetails) -> str:
        retry_policy = RetryPolicy(
            maximum_attempts=3,
            maximum_interval=timedelta(seconds=2),
            non_retryable_error_types=["InvalidAccountError", "InsufficientFundsError"],
        )

        # Withdraw money
        withdraw_output = await workflow.execute_activity_method(
            BankingActivities.withdraw,
            payment_details,
            start_to_close_timeout=timedelta(seconds=5),
            retry_policy=retry_policy,
        )

        # Deposit money
        try:
            deposit_output = await workflow.execute_activity_method(
                BankingActivities.deposit,
                payment_details,
                start_to_close_timeout=timedelta(seconds=5),
                retry_policy=retry_policy,
            )

            result = f"Transfer complete (transaction IDs: {withdraw_output}, {deposit_output})"
            return result
        except ActivityError as deposit_err:
            # Handle deposit error
            workflow.logger.error(f"Deposit failed: {deposit_err}")
            # Attempt to refund
            try:
                refund_output = await workflow.execute_activity_method(
                    BankingActivities.refund,
                    payment_details,
                    start_to_close_timeout=timedelta(seconds=5),
                    retry_policy=retry_policy,
                )
                workflow.logger.info(
                    f"Refund successful. Confirmation ID: {refund_output}"
                )
                raise deposit_err
            except ActivityError as refund_error:
                workflow.logger.error(f"Refund failed: {refund_error}")
                raise refund_error
Activity Definition
Activities handle the business logic. Each activity method calls an external banking service:
activities.py
import asyncio
from temporalio import activity
from shared import PaymentDetails

class BankingActivities:
    @activity.defn
    async def withdraw(self, data: PaymentDetails) -> str:
        reference_id = f"{data.reference_id}-withdrawal"
        try:
            confirmation = await asyncio.to_thread(
                self.bank.withdraw, data.source_account, data.amount, reference_id
            )
            return confirmation
        except InvalidAccountError:
            raise
        except Exception:
            activity.logger.exception("Withdrawal failed")
            raise
Workflow Definition
In the Temporal Go SDK, a Workflow Definition is a Go function that accepts a Workflow Context and input parameters.
This is what the Workflow Definition looks like for the money transfer process:
workflow.go
func MoneyTransfer(ctx workflow.Context, input PaymentDetails) (string, error) {
    // RetryPolicy specifies how to automatically handle retries if an Activity fails.
    retrypolicy := &temporal.RetryPolicy{
        InitialInterval:        time.Second,
        BackoffCoefficient:     2.0,
        MaximumInterval:        100 * time.Second,
        MaximumAttempts:        500, // 0 is unlimited retries
        NonRetryableErrorTypes: []string{"InvalidAccountError", "InsufficientFundsError"},
    }

    options := workflow.ActivityOptions{
        // Timeout options specify when to automatically timeout Activity functions.
        StartToCloseTimeout: time.Minute,
        // Optionally provide a customized RetryPolicy.
        // Temporal retries failed Activities by default.
        RetryPolicy: retrypolicy,
    }

    // Apply the options.
    ctx = workflow.WithActivityOptions(ctx, options)

    // Withdraw money.
    var withdrawOutput string
    withdrawErr := workflow.ExecuteActivity(ctx, Withdraw, input).Get(ctx, &withdrawOutput)
    if withdrawErr != nil {
        return "", withdrawErr
    }

    // Deposit money.
    var depositOutput string
    depositErr := workflow.ExecuteActivity(ctx, Deposit, input).Get(ctx, &depositOutput)
    if depositErr != nil {
        // The deposit failed; put money back in original account.
        var result string
        refundErr := workflow.ExecuteActivity(ctx, Refund, input).Get(ctx, &result)
        if refundErr != nil {
            return "",
                fmt.Errorf("Deposit: failed to deposit money into %v: %v. Money could not be returned to %v: %w",
                    input.TargetAccount, depositErr, input.SourceAccount, refundErr)
        }
        return "", fmt.Errorf("Deposit: failed to deposit money into %v: Money returned to %v: %w",
            input.TargetAccount, input.SourceAccount, depositErr)
    }

    result := fmt.Sprintf("Transfer complete (transaction IDs: %s, %s)", withdrawOutput, depositOutput)
    return result, nil
}
The MoneyTransfer function takes in the details about the transaction, executes Activities to withdraw and deposit the money, and returns the results of the process. The PaymentDetails type is defined in shared.go:
shared.go
type PaymentDetails struct {
    SourceAccount string
    TargetAccount string
    Amount        int
    ReferenceID   string
}
Activity Definition
Activities handle the business logic. Each Activity function calls an external banking service:
activity.go
func Withdraw(ctx context.Context, data PaymentDetails) (string, error) {
    log.Printf("Withdrawing $%d from account %s.\n\n",
        data.Amount,
        data.SourceAccount,
    )

    referenceID := fmt.Sprintf("%s-withdrawal", data.ReferenceID)
    bank := BankingService{"bank-api.example.com"}
    confirmation, err := bank.Withdraw(data.SourceAccount, data.Amount, referenceID)
    return confirmation, err
}

func Deposit(ctx context.Context, data PaymentDetails) (string, error) {
    log.Printf("Depositing $%d into account %s.\n\n",
        data.Amount,
        data.TargetAccount,
    )

    referenceID := fmt.Sprintf("%s-deposit", data.ReferenceID)
    bank := BankingService{"bank-api.example.com"}
    confirmation, err := bank.Deposit(data.TargetAccount, data.Amount, referenceID)
    return confirmation, err
}
Workflow Definition
In the Temporal Java SDK, a Workflow Definition is marked by the @WorkflowInterface attribute placed above the class interface.
MoneyTransferWorkflow.java
@WorkflowInterface
public interface MoneyTransferWorkflow {
    @WorkflowMethod
    void transfer(TransactionDetails transaction);
}
MoneyTransferWorkflowImpl.java
public class MoneyTransferWorkflowImpl implements MoneyTransferWorkflow {

    // RetryOptions specify how to automatically handle retries when Activities fail
    private final RetryOptions retryoptions = RetryOptions.newBuilder()
        .setInitialInterval(Duration.ofSeconds(1))
        .setMaximumInterval(Duration.ofSeconds(20))
        .setBackoffCoefficient(2)
        .setMaximumAttempts(5000)
        .build();

    private final ActivityOptions defaultActivityOptions = ActivityOptions.newBuilder()
        .setRetryOptions(retryoptions)
        .setStartToCloseTimeout(Duration.ofSeconds(2))
        .setScheduleToCloseTimeout(Duration.ofSeconds(5000))
        .build();

    private final AccountActivity accountActivityStub =
        Workflow.newActivityStub(AccountActivity.class, defaultActivityOptions);

    @Override
    public void transfer(TransactionDetails transaction) {
        String sourceAccountId = transaction.getSourceAccountId();
        String destinationAccountId = transaction.getDestinationAccountId();
        String transactionReferenceId = transaction.getTransactionReferenceId();
        int amountToTransfer = transaction.getAmountToTransfer();

        // Stage 1: Withdraw funds from source
        try {
            accountActivityStub.withdraw(sourceAccountId, transactionReferenceId, amountToTransfer);
        } catch (Exception e) {
            System.out.printf("[%s] Withdrawal of $%d from account %s failed",
                            transactionReferenceId, amountToTransfer, sourceAccountId);
            return;
        }

        // Stage 2: Deposit funds to destination
        try {
            accountActivityStub.deposit(destinationAccountId, transactionReferenceId, amountToTransfer);
            System.out.printf("[%s] Transaction succeeded.\n", transactionReferenceId);
            return;
        } catch (Exception e) {
            System.out.printf("[%s] Deposit of $%d to account %s failed.\n",
                            transactionReferenceId, amountToTransfer, destinationAccountId);
        }

        // Compensate with a refund
        try {
            System.out.printf("[%s] Refunding $%d to account %s.\n",
                            transactionReferenceId, amountToTransfer, sourceAccountId);
            accountActivityStub.refund(sourceAccountId, transactionReferenceId, amountToTransfer);
            System.out.printf("[%s] Refund to originating account was successful.\n", transactionReferenceId);
        } catch (Exception e) {
            System.out.printf("[%s] Workflow failed.", transactionReferenceId);
            throw(e);
        }
    }
}
The TransactionDetails interface:
TransactionDetails.java
public interface TransactionDetails {
    String getSourceAccountId();
    String getDestinationAccountId();
    String getTransactionReferenceId();
    int getAmountToTransfer();
}
Activity Definition
Activities handle the business logic. Each Activity method calls an external banking service:
AccountActivity.java
@ActivityInterface
public interface AccountActivity {
    @ActivityMethod
    void withdraw(String accountId, String referenceId, int amount);

    @ActivityMethod
    void deposit(String accountId, String referenceId, int amount);

    @ActivityMethod
    void refund(String accountId, String referenceId, int amount);
}
AccountActivityImpl.java
public class AccountActivityImpl implements AccountActivity {
    @Override
    public void withdraw(String accountId, String referenceId, int amount) {
        System.out.printf("\nWithdrawing $%d from account %s.\n[ReferenceId: %s]\n",
                         amount, accountId, referenceId);
    }

    @Override
    public void deposit(String accountId, String referenceId, int amount) {
        System.out.printf("\nDepositing $%d into account %s.\n[ReferenceId: %s]\n",
                         amount, accountId, referenceId);
    }

    @Override
    public void refund(String accountId, String referenceId, int amount) {
        System.out.printf("\nRefunding $%d to account %s.\n[ReferenceId: %s]\n",
                         amount, accountId, referenceId);
    }
}
Workflow Definition
In the Temporal TypeScript SDK, a Workflow Definition is a regular TypeScript function that accepts some input values.
This is what the Workflow Definition looks like for the money transfer process:
workflows.ts
import { proxyActivities } from '@temporalio/workflow';
import { ApplicationFailure } from '@temporalio/common';

import type * as activities from './activities';
import type { PaymentDetails } from './shared';

export async function moneyTransfer(details: PaymentDetails): Promise<string> {
  // Get the Activities for the Workflow and set up the Activity Options.
  const { withdraw, deposit, refund } = proxyActivities<typeof activities>({
    // RetryPolicy specifies how to automatically handle retries if an Activity fails.
    retry: {
      initialInterval: '1 second',
      maximumInterval: '1 minute',
      backoffCoefficient: 2,
      maximumAttempts: 500,
      nonRetryableErrorTypes: ['InvalidAccountError', 'InsufficientFundsError'],
    },
    startToCloseTimeout: '1 minute',
  });

  // Execute the withdraw Activity
  let withdrawResult: string;
  try {
    withdrawResult = await withdraw(details);
  } catch (withdrawErr) {
    throw new ApplicationFailure(`Withdrawal failed. Error: ${withdrawErr}`);
  }

  //Execute the deposit Activity
  let depositResult: string;
  try {
    depositResult = await deposit(details);
  } catch (depositErr) {
    // The deposit failed; try to refund the money.
    let refundResult;
    try {
      refundResult = await refund(details);
      throw ApplicationFailure.create({
        message: `Failed to deposit money into account ${details.targetAccount}. Money returned to ${details.sourceAccount}. Cause: ${depositErr}.`,
      });
    } catch (refundErr) {
      throw ApplicationFailure.create({
        message: `Failed to deposit money into account ${details.targetAccount}. Money could not be returned to ${details.sourceAccount}. Cause: ${refundErr}.`,
      });
    }
  }
  return `Transfer complete (transaction IDs: ${withdrawResult}, ${depositResult})`;
}
The PaymentDetails type is defined in shared.ts:
shared.ts
export type PaymentDetails = {
  amount: number;
  sourceAccount: string;
  targetAccount: string;
  referenceId: string;
};
Activity Definition
Activities handle the business logic. Each Activity function calls an external banking service:
activities.ts
import type { PaymentDetails } from './shared';
import { BankingService } from './banking-client';

export async function withdraw(details: PaymentDetails): Promise<string> {
  console.log(
    `Withdrawing $${details.amount} from account ${details.sourceAccount}.\n\n`
  );
  const bank1 = new BankingService('bank1.example.com');
  return await bank1.withdraw(
    details.sourceAccount,
    details.amount,
    details.referenceId
  );
}

export async function deposit(details: PaymentDetails): Promise<string> {
  console.log(
    `Depositing $${details.amount} into account ${details.targetAccount}.\n\n`
  );
  const bank2 = new BankingService('bank2.example.com');
  return await bank2.deposit(
    details.targetAccount,
    details.amount,
    details.referenceId
  );
}

export async function refund(details: PaymentDetails): Promise<string> {
  console.log(
    `Refunding $${details.amount} to account ${details.sourceAccount}.\n\n`
  );
  const bank1 = new BankingService('bank1.example.com');
  return await bank1.deposit(
    details.sourceAccount,
    details.amount,
    details.referenceId
  );
}
Workflow Definition
In the Temporal PHP SDK, a Workflow Definition is a class marked with the #[WorkflowInterface] attribute.
This is what the Workflow Definition looks like for the money transfer process:
MoneyTransfer.php
<?php

declare(strict_types=1);

namespace App\Workflow;

use App\Banking\Banking;
use App\Banking\Exception\InsufficientFunds;
use App\Banking\Exception\InvalidAccount;
use App\Banking\PaymentDetails;
use Temporal\Activity\ActivityOptions;
use Temporal\Common\RetryOptions;
use Temporal\DataConverter\Type;
use Temporal\Exception\Failure\ActivityFailure;
use Temporal\Internal\Workflow\ActivityProxy;
use Temporal\Workflow;
use Temporal\Workflow\ReturnType;
use Temporal\Workflow\WorkflowInterface;
use Temporal\Workflow\WorkflowMethod;

#[WorkflowInterface]
final class MoneyTransfer
{
    private Banking|ActivityProxy $bankingActivity;

    public function __construct()
    {
        $this->bankingActivity = Workflow::newActivityStub(
            Banking::class,
            ActivityOptions::new()
                ->withStartToCloseTimeout('5 seconds')
                ->withRetryOptions(
                    RetryOptions::new()
                        ->withMaximumAttempts(3)
                        ->withMaximumInterval('2 seconds')
                        ->withNonRetryableExceptions([InvalidAccount::class, InsufficientFunds::class]),
                ),
        );
    }

    #[WorkflowMethod('money_transfer')]
    #[ReturnType(Type::TYPE_STRING)]
    public function handle(PaymentDetails $paymentDetails): \Generator
    {
        # Withdraw money
        $withdrawOutput = yield $this->bankingActivity->withdraw($paymentDetails);

        # Deposit money
        try {
            $depositOutput = yield $this->bankingActivity->deposit($paymentDetails);
            return "Transfer complete (transaction IDs: {$withdrawOutput}, {$depositOutput})";
        } catch (\Throwable $depositError) {
            # Handle deposit error
            Workflow::getLogger()->error("Deposit failed: {$depositError->getMessage()}");

            # Attempt to refund
            try {
                $refundOutput = yield $this->bankingActivity->refund($paymentDetails);
                Workflow::getLogger()->info('Refund successful. Confirmation ID: ' . $refundOutput);
            } catch (ActivityFailure $refundError) {
                Workflow::getLogger()->error("Refund failed: {$refundError->getMessage()}");
                throw $refundError;
            }

            # Re-raise deposit error if refund was successful
            throw $depositError;
        }
    }
}
Activity Definition
Activities handle the business logic. Each Activity method calls an external banking service:
BankingActivity.php
<?php

declare(strict_types=1);

namespace App\Banking\Internal;

use App\Banking\Exception\InvalidAccount;
use App\Banking\PaymentDetails;
use Psr\Log\LoggerInterface;

final class BankingActivity implements Banking
{
    public function __construct(
        private readonly LoggerInterface $logger,
        private readonly Service $bank,
    ) {}

    #[\Override]
    public function withdraw(PaymentDetails $data): string
    {
        $referenceId = $data->referenceId . "-withdrawal";
        try {
            $confirmation = $this->bank->withdraw(
                $data->sourceAccount,
                $data->amount,
                $referenceId,
            );
            return $confirmation;
        } catch (InvalidAccount $e) {
            throw $e;
        } catch (\Throwable $e) {
            $this->logger->error("Withdrawal failed", ['exception' => $e]);
            throw $e;
        }
    }
}
Workflow Definition
In the Temporal .NET SDK, a Workflow Definition is marked by the [Workflow] attribute placed above the class.
This is what the Workflow Definition looks like for this process:
MoneyTransferWorker/Workflow.cs
[Workflow]
public class MoneyTransferWorkflow
{
    [WorkflowRun]
    public async Task<string> RunAsync(PaymentDetails details)
    {
        // Retry policy
        var retryPolicy = new RetryPolicy
        {
            InitialInterval = TimeSpan.FromSeconds(1),
            MaximumInterval = TimeSpan.FromSeconds(100),
            BackoffCoefficient = 2,
            MaximumAttempts = 3,
            NonRetryableErrorTypes = new[] { "InvalidAccountException", "InsufficientFundsException" }
        };

        string withdrawResult;
        try
        {
            withdrawResult = await Workflow.ExecuteActivityAsync(
                () => BankingActivities.WithdrawAsync(details),
                new ActivityOptions { StartToCloseTimeout = TimeSpan.FromMinutes(5), RetryPolicy = retryPolicy }
            );
        }
        catch (ApplicationFailureException ex) when (ex.ErrorType == "InsufficientFundsException")
        {
            throw new ApplicationFailureException("Withdrawal failed due to insufficient funds.", ex);
        }

        string depositResult;
        try
        {
            depositResult = await Workflow.ExecuteActivityAsync(
                () => BankingActivities.DepositAsync(details),
                new ActivityOptions { StartToCloseTimeout = TimeSpan.FromMinutes(5), RetryPolicy = retryPolicy }
            );
            return $"Transfer complete (transaction IDs: {withdrawResult}, {depositResult})";
        }
        catch (Exception depositEx)
        {
            try
            {
                // if the deposit fails, attempt to refund the withdrawal
                string refundResult = await Workflow.ExecuteActivityAsync(
                    () => BankingActivities.RefundAsync(details),
                    new ActivityOptions { StartToCloseTimeout = TimeSpan.FromMinutes(5), RetryPolicy = retryPolicy }
                );
                throw new ApplicationFailureException($"Failed to deposit money into account {details.TargetAccount}. Money returned to {details.SourceAccount}.", depositEx);
            }
            catch (Exception refundEx)
            {
                throw new ApplicationFailureException($"Failed to deposit money into account {details.TargetAccount}. Money could not be returned to {details.SourceAccount}. Cause: {refundEx.Message}", refundEx);
            }
        }
    }
}
The PaymentDetails record is defined in PaymentDetails.cs:
MoneyTransferWorker/PaymentDetails.cs
public record PaymentDetails(
    string SourceAccount,
    string TargetAccount,
    int Amount,
    string ReferenceId);
Activity Definition
Activities handle the business logic. Each Activity method calls an external banking service:
MoneyTransferWorker/Activities.cs
public class BankingActivities
{
    [Activity]
    public static async Task<string> WithdrawAsync(PaymentDetails details)
    {
        var bankService = new BankingService("bank1.example.com");
        Console.WriteLine($"Withdrawing ${details.Amount} from account {details.SourceAccount}.");
        try
        {
            return await bankService.WithdrawAsync(details.SourceAccount, details.Amount, details.ReferenceId).ConfigureAwait(false);
        }
        catch (Exception ex)
        {
            throw new ApplicationFailureException("Withdrawal failed", ex);
        }
    }

    [Activity]
    public static async Task<string> DepositAsync(PaymentDetails details)
    {
        var bankService = new BankingService("bank2.example.com");
        Console.WriteLine($"Depositing ${details.Amount} into account {details.TargetAccount}.");

        try
        {
            return await bankService.DepositAsync(details.TargetAccount, details.Amount, details.ReferenceId);
        }
        catch (Exception ex)
        {
            throw new ApplicationFailureException("Deposit failed", ex);
        }
    }
}
Workflow Definition
In the Temporal Ruby SDK, a Workflow Definition is a class that extends Temporalio::Workflow::Definition.
This is what the Workflow Definition looks like for the money transfer process:
workflow.rb
class MoneyTransferWorkflow < Temporalio::Workflow::Definition
  def execute(details)
    retry_policy = Temporalio::RetryPolicy.new(
      max_interval: 10,
      non_retryable_error_types: [
        'InvalidAccountError',
        'InsufficientFundsError'
      ]
    )

    Temporalio::Workflow.logger.info("Starting workflow (#{details})")

    withdraw_result = Temporalio::Workflow.execute_activity(
      BankActivities::Withdraw,
      details,
      start_to_close_timeout: 5,
      retry_policy: retry_policy
    )

    begin
      deposit_result = Temporalio::Workflow.execute_activity(
        BankActivities::Deposit,
        details,
        start_to_close_timeout: 5,
        retry_policy: retry_policy
      )

      "Transfer complete (transaction IDs: #{withdraw_result}, #{deposit_result})"
    rescue Temporalio::Error::ActivityError => e
      # Since the deposit failed, attempt to recover by refunding
      begin
        refund_result = Temporalio::Workflow.execute_activity(
          BankActivities::Refund,
          details,
          start_to_close_timeout: 5,
          retry_policy: retry_policy
        )

        "Transfer complete (transaction IDs: #{withdraw_result}, #{refund_result})"
      rescue Temporalio::Error::ActivityError => refund_error
        Temporalio::Workflow.logger.error("Refund failed: #{refund_error}")
      end
    end
  end
end
The TransferDetails struct is defined in shared.rb:
shared.rb
TransferDetails = Struct.new(:source_account, :target_account, :amount, :reference_id) do
  def to_s
    "TransferDetails { #{source_account}, #{target_account}, #{amount}, #{reference_id} }"
  end
end
Activity Definition
Activities handle the business logic. Each Activity class calls an external banking service:
activities.rb
module BankActivities
  class Withdraw < Temporalio::Activity::Definition
    def execute(details)
      puts("Doing a withdrawal from #{details.source_account} for #{details.amount}")
      raise InsufficientFundsError, 'Transfer amount too large' if details.amount > 1000

      "OKW-#{details.amount}-#{details.source_account}"
    end
  end

  class Deposit < Temporalio::Activity::Definition
    def execute(details)
      puts("Doing a deposit into #{details.target_account} for #{details.amount}")
      raise InvalidAccountError, 'Invalid account number' if details.target_account == 'B5555'

      "OKD-#{details.amount}-#{details.target_account}"
    end
  end

  class Refund < Temporalio::Activity::Definition
    def execute(details)
      puts("Refunding #{details.amount} back to account #{details.source_account}")

      "OKR-#{details.amount}-#{details.source_account}"
    end
  end
end
Step 2: Set the Retry Policy
Temporal makes your software durable and fault tolerant by default. If an Activity fails, Temporal automatically retries it, but you can customize this behavior through a Retry Policy.
Retry Policy Configuration
In the MoneyTransfer Workflow, you'll see a Retry Policy that controls this behavior:
workflows.py
# ...
retry_policy = RetryPolicy(
    maximum_attempts=3,                    # Stop after 3 tries
    maximum_interval=timedelta(seconds=2), # Don't wait longer than 2s
    non_retryable_error_types=[           # Never retry these errors
        "InvalidAccountError",
        "InsufficientFundsError"
    ],
)
workflow.go
// ...
// RetryPolicy specifies how to automatically handle retries if an Activity fails.
retrypolicy := &temporal.RetryPolicy{
    InitialInterval:        time.Second,                                             // Start with 1 second wait
    BackoffCoefficient:     2.0,                                                     // Double the wait each time
    MaximumInterval:        100 * time.Second,                                       // Don't wait longer than 100s
    MaximumAttempts:        500,                                                     // Stop after 500 tries (0 = unlimited)
    NonRetryableErrorTypes: []string{"InvalidAccountError", "InsufficientFundsError"}, // Never retry these errors
}

options := workflow.ActivityOptions{
    StartToCloseTimeout: time.Minute,
    RetryPolicy: retrypolicy,
}

// Apply the options.
src/main/java/moneytransfer/MoneyTransferWorkflowImpl.java
// ...
private static final String WITHDRAW = "Withdraw";

// RetryOptions specify how to automatically handle retries when Activities fail
private final RetryOptions retryoptions = RetryOptions.newBuilder()
    .setInitialInterval(Duration.ofSeconds(1))  // Start with 1 second wait
    .setMaximumInterval(Duration.ofSeconds(20)) // Don't wait longer than 20s
    .setBackoffCoefficient(2)                   // Double the wait each time (1s, 2s, 4s, etc)
    .setMaximumAttempts(5000)                   // Stop after 5000 tries
    .build();
src/workflows.ts
// ...
const { withdraw, deposit, refund } = proxyActivities<typeof activities>({
  // RetryPolicy specifies how to automatically handle retries if an Activity fails.
  retry: {
    initialInterval: '1 second',                                                    // Start with 1 second wait
    maximumInterval: '1 minute',                                                    // Don't wait longer than 1 minute
    backoffCoefficient: 2,                                                          // Double the wait each time
    maximumAttempts: 500,                                                           // Stop after 500 tries
    nonRetryableErrorTypes: ['InvalidAccountError', 'InsufficientFundsError'],      // Never retry these errors
  },
  startToCloseTimeout: '1 minute',                                                   // Activity must complete within 1 minute
});
MoneyTransfer.php
// ...
$this->bankingActivity = Workflow::newActivityStub(
    Banking::class,
    ActivityOptions::new()
        ->withStartToCloseTimeout('5 seconds')
        ->withRetryOptions(
            RetryOptions::new()
                ->withMaximumAttempts(3)                    // Stop after 3 tries
                ->withMaximumInterval('2 seconds')          // Don't wait longer than 2s
                ->withNonRetryableExceptions([              // Never retry these errors
                    InvalidAccount::class,
                    InsufficientFunds::class
                ]),
        ),
);
MoneyTransferWorker/Workflow.cs
// ...
// Retry policy
var retryPolicy = new RetryPolicy
{
    InitialInterval = TimeSpan.FromSeconds(1),                                                 // Start with 1 second wait
    MaximumInterval = TimeSpan.FromSeconds(100),                                               // Don't wait longer than 100s
    BackoffCoefficient = 2,                                                                    // Double the wait each time
    MaximumAttempts = 3,                                                                       // Stop after 3 tries
    NonRetryableErrorTypes = new[] { "InvalidAccountException", "InsufficientFundsException" } // Never retry these errors
};
workflow.rb
# Temporal Workflow that withdraws the specified amount from the source
# account and deposits it into the target account, refunding the source
# account if the deposit cannot be completed.
class MoneyTransferWorkflow < Temporalio::Workflow::Definition
  def execute(details)
    retry_policy = Temporalio::RetryPolicy.new(
      max_interval: 10,                    # Don't wait longer than 10s
      non_retryable_error_types: [         # Never retry these errors
        'InvalidAccountError',
        'InsufficientFundsError'
      ]
    )
What Makes Errors Non-Retryable?
Without retry policies, a temporary network glitch could cause your entire money transfer to fail. With Temporal's intelligent retries, your workflow becomes resilient to these common infrastructure issues.
Don't Retry
- InvalidAccountError - Wrong account number
- InsufficientFundsError - Not enough money
These are business logic errors that won't be fixed by retrying.
Retry Automatically
- Network timeouts - Temporary connectivity
- Service unavailable - External API down
- Rate limiting - Too many requests
These are temporary issues that often resolve themselves.
This tutorial shows core Temporal features and is not intended for production use. A real money transfer system would need additional logic for edge cases, cancellations, and error handling.
Step 3: Create a Worker file
A Worker is responsible for executing your Workflow and Activity code. It:
- Can only execute Workflows and Activities registered to it
- Knows which piece of code to execute based on Tasks from the Task Queue
- Only listens to the Task Queue that it's registered to
- Returns execution results back to the Temporal Server
run_worker.py
import asyncio

from temporalio.client import Client
from temporalio.worker import Worker

from activities import BankingActivities
from shared import MONEY_TRANSFER_TASK_QUEUE_NAME
from workflows import MoneyTransfer


async def main() -> None:
    client: Client = await Client.connect("localhost:7233", namespace="default")
    # Run the worker
    activities = BankingActivities()
    worker: Worker = Worker(
        client,
        task_queue=MONEY_TRANSFER_TASK_QUEUE_NAME,
        workflows=[MoneyTransfer],
        activities=[activities.withdraw, activities.deposit, activities.refund],
    )
    await worker.run()


if __name__ == "__main__":
    asyncio.run(main())
worker/main.go
func main() {
    c, err := client.Dial(client.Options{})
    if err != nil {
        log.Fatalln("Unable to create Temporal client.", err)
    }
    defer c.Close()

    w := worker.New(c, app.MoneyTransferTaskQueueName, worker.Options{})

    // This worker hosts both Workflow and Activity functions.
    w.RegisterWorkflow(app.MoneyTransfer)
    w.RegisterActivity(app.Withdraw)
    w.RegisterActivity(app.Deposit)
    w.RegisterActivity(app.Refund)

    // Start listening to the Task Queue.
    err = w.Run(worker.InterruptCh())
    if err != nil {
        log.Fatalln("unable to start Worker", err)
    }
}
src/main/java/moneytransfer/MoneyTransferWorker.java
package moneytransferapp;

import io.temporal.client.WorkflowClient;
import io.temporal.serviceclient.WorkflowServiceStubs;
import io.temporal.worker.Worker;
import io.temporal.worker.WorkerFactory;

public class MoneyTransferWorker {
    public static void main(String[] args) {
        // Create a stub that accesses a Temporal Service on the local development machine
        WorkflowServiceStubs serviceStub = WorkflowServiceStubs.newLocalServiceStubs();

        // The Worker uses the Client to communicate with the Temporal Service
        WorkflowClient client = WorkflowClient.newInstance(serviceStub);

        // A WorkerFactory creates Workers
        WorkerFactory factory = WorkerFactory.newInstance(client);

        // A Worker listens to one Task Queue.
        // This Worker processes both Workflows and Activities
        Worker worker = factory.newWorker(Shared.MONEY_TRANSFER_TASK_QUEUE);

        // Register a Workflow implementation with this Worker
        // The implementation must be known at runtime to dispatch Workflow tasks
        // Workflows are stateful so a type is needed to create instances.
        worker.registerWorkflowImplementationTypes(MoneyTransferWorkflowImpl.class);

        // Register Activity implementation(s) with this Worker.
        // The implementation must be known at runtime to dispatch Activity tasks
        // Activities are stateless and thread safe so a shared instance is used.
        worker.registerActivitiesImplementations(new AccountActivityImpl());

        System.out.println("Worker is running and actively polling the Task Queue.");
        System.out.println("To quit, use ^C to interrupt.");

        // Start all registered Workers. The Workers will start polling the Task Queue.
        factory.start();
    }
}
src/worker.ts
import { Worker } from '@temporalio/worker';
import * as activities from './activities';
import { namespace, taskQueueName } from './shared';

async function run() {
  // Register Workflows and Activities with the Worker and connect to
  // the Temporal server.
  const worker = await Worker.create({
    workflowsPath: require.resolve('./workflows'),
    activities,
    namespace,
    taskQueue: taskQueueName,
  });

  // Start accepting tasks from the Task Queue.
  await worker.run();
}

run().catch((err) => {
  console.error(err);
  process.exit(1);
});
Worker.php
<?php

declare(strict_types=1);

namespace App\Worker;

use App\Banking\Internal\BankingActivity;
use App\Banking\Internal\Service;
use Temporal\Worker\FeatureFlags;
use Temporal\Worker\Logger\StderrLogger;
use Temporal\WorkerFactory;

require_once __DIR__ . '/../vendor/autoload.php';

# Configure Worker behavior
FeatureFlags::$workflowDeferredHandlerStart = true;

# Create a Worker Factory
$logger = new StderrLogger();
$factory = WorkerFactory::create();
$worker = $factory->newWorker('default', logger: $logger);

# Register Workflows
$worker->registerWorkflowTypes(\App\Workflow\MoneyTransfer::class);

# Register Activities
$worker->registerActivity(BankingActivity::class, static fn(): BankingActivity => new BankingActivity(
    $logger,
    new Service('bank-api.example.com'),
));

$factory->run();
MoneyTransferWorker/Program.cs
// This file is designated to run the worker
using Temporalio.Client;
using Temporalio.Worker;
using Temporalio.MoneyTransferProject.MoneyTransferWorker;

// Create a client to connect to localhost on "default" namespace
var client = await TemporalClient.ConnectAsync(new("localhost:7233"));

// Cancellation token to shutdown worker on ctrl+c
using var tokenSource = new CancellationTokenSource();
Console.CancelKeyPress += (_, eventArgs) =>
{
    tokenSource.Cancel();
    eventArgs.Cancel = true;
};

// Create an instance of the activities since we have instance activities.
// If we had all static activities, we could just reference those directly.
var activities = new BankingActivities();

// Create a worker with the activity and workflow registered
using var worker = new TemporalWorker(
    client, // client
    new TemporalWorkerOptions(taskQueue: "MONEY_TRANSFER_TASK_QUEUE")
        .AddAllActivities(activities) // Register activities
        .AddWorkflow<MoneyTransferWorkflow>() // Register workflow
);

// Run the worker until it's cancelled
Console.WriteLine("Running worker...");
try
{
    await worker.ExecuteAsync(tokenSource.Token);
}
catch (OperationCanceledException)
{
    Console.WriteLine("Worker cancelled");
}
worker.rb
require_relative 'activities'
require_relative 'shared'
require_relative 'workflow'
require 'logger'
require 'temporalio/client'
require 'temporalio/worker'

# Create a Temporal Client that connects to a local Temporal Service, uses
# a Namespace called 'default', and displays log messages to standard output
client = Temporalio::Client.connect(
  'localhost:7233',
  'default',
  logger: Logger.new($stdout, level: Logger::INFO)
)

# Create a Worker that polls the specified Task Queue and can
# fulfill requests for the specified Workflow and Activities
worker = Temporalio::Worker.new(
  client:,
  task_queue: MoneyTransfer::TASK_QUEUE_NAME,
  workflows: [MoneyTransfer::MoneyTransferWorkflow],
  activities: [MoneyTransfer::BankActivities::Withdraw,
               MoneyTransfer::BankActivities::Deposit,
               MoneyTransfer::BankActivities::Refund]
)

# Start the Worker, which will poll the Task Queue until stopped
puts 'Starting Worker (press Ctrl+C to exit)'
worker.run(shutdown_signals: ['SIGINT'])
Step 4: Define the Task Queue
A Task Queue is where Temporal Workers look for Tasks about Workflows and Activities to execute. Each Task Queue is identified by a name, which you will specify when you configure the Worker and again in the code that starts the Workflow Execution. To ensure that the same name is used in both places, this project follows the recommended practice of specifying the Task Queue name in a constant referenced from both places.
Set Your Task Queue Name
To ensure your Worker and Workflow starter use the same queue, define the Task Queue name as a constant:
shared.py
# Task Queue name - used by both Worker and Workflow starter
MONEY_TRANSFER_TASK_QUEUE_NAME = "MONEY_TRANSFER_TASK_QUEUE"
app/shared.go
package app

// MoneyTransferTaskQueueName is the task queue name used by both
// the Worker and the Workflow starter
const MoneyTransferTaskQueueName = "MONEY_TRANSFER_TASK_QUEUE"
src/main/java/moneytransfer/Shared.java
package moneytransferapp;

public class Shared {
    // Task Queue name used by both Worker and Workflow starter
    public static final String MONEY_TRANSFER_TASK_QUEUE = "MONEY_TRANSFER_TASK_QUEUE";
}
src/shared.ts
// Task Queue name - used by both Worker and Workflow starter
export const taskQueueName = 'MONEY_TRANSFER_TASK_QUEUE';
export const namespace = 'default';
shared.php or in your Worker.php
<?php

declare(strict_types=1);

namespace App\Shared;

# Task Queue name used by both Worker and Workflow starter
const MONEY_TRANSFER_TASK_QUEUE = 'MONEY_TRANSFER_TASK_QUEUE';
Shared/Constants.cs
namespace MoneyTransferProject.Shared
{
    public static class Constants
    {
        // Task Queue name used by both Worker and Workflow starter
        public const string MONEY_TRANSFER_TASK_QUEUE = "MONEY_TRANSFER_TASK_QUEUE";
    }
}
shared.rb
module MoneyTransfer
  # Task Queue name used by both Worker and Workflow starter
  TASK_QUEUE_NAME = "MONEY_TRANSFER_TASK_QUEUE".freeze
end
Using a shared constant prevents typos that would cause your Worker to listen to a different Task Queue than where your Workflow tasks are being sent. It's a common source of "Why isn't my Workflow running?" issues.
Step 5: Execute the Workflow
Now you'll create a client program that starts a Workflow execution. This code connects to the Temporal Service and submits a Workflow execution request:
start_workflow.py
import asyncio
from temporalio.client import Client
from workflows import MoneyTransfer
from shared import MONEY_TRANSFER_TASK_QUEUE_NAME

async def main():
    # Create the Temporal Client to connect to the Temporal Service
    client = await Client.connect("localhost:7233", namespace="default")

    # Define the money transfer details
    details = {
        "source_account": "A1001",
        "target_account": "B2002",
        "amount": 100,
        "reference_id": "12345"
    }

    # Start the Workflow execution
    handle = await client.start_workflow(
        MoneyTransfer.run,
        details,
        id=f"money-transfer-{details['reference_id']}",
        task_queue=MONEY_TRANSFER_TASK_QUEUE_NAME,
    )

    print(f"Started Workflow {handle.id}")
    print(f"Transferring ${details['amount']} from {details['source_account']} to {details['target_account']}")

    # Wait for the result
    result = await handle.result()
    print(f"Workflow result: {result}")

if __name__ == "__main__":
    asyncio.run(main())
start/main.go
func main() {
    // Create the client object just once per process
    c, err := client.Dial(client.Options{})
    if err != nil {
        log.Fatalln("Unable to create Temporal client:", err)
    }
    defer c.Close()

    input := app.PaymentDetails{
        SourceAccount: "85-150",
        TargetAccount: "43-812",
        Amount:        250,
        ReferenceID:   "12345",
    }

    options := client.StartWorkflowOptions{
        ID:        "pay-invoice-701",
        TaskQueue: app.MoneyTransferTaskQueueName,
    }

    log.Printf("Starting transfer from account %s to account %s for %d",
               input.SourceAccount, input.TargetAccount, input.Amount)

    we, err := c.ExecuteWorkflow(context.Background(), options, app.MoneyTransfer, input)
    if err != nil {
        log.Fatalln("Unable to start the Workflow:", err)
    }

    log.Printf("WorkflowID: %s RunID: %s\n", we.GetID(), we.GetRunID())

    var result string
    err = we.Get(context.Background(), &result)
    if err != nil {
        log.Fatalln("Unable to get Workflow result:", err)
    }

    log.Println(result)
}
src/main/java/moneytransfer/TransferApp.java
public class TransferApp {
    public static void main(String[] args) throws Exception {
        // A WorkflowServiceStubs communicates with the Temporal front-end service.
        WorkflowServiceStubs serviceStub = WorkflowServiceStubs.newLocalServiceStubs();

        // A WorkflowClient wraps the stub and can be used to start, signal, query, cancel, and terminate Workflows.
        WorkflowClient client = WorkflowClient.newInstance(serviceStub);

        // Workflow options configure Workflow stubs.
        // A WorkflowId prevents duplicate instances.
        WorkflowOptions options = WorkflowOptions.newBuilder()
                .setTaskQueue(Shared.MONEY_TRANSFER_TASK_QUEUE)
                .setWorkflowId("money-transfer-workflow")
                .build();

        // WorkflowStubs enable calls to methods as if the Workflow object is local
        // but actually perform a gRPC call to the Temporal Service.
        MoneyTransferWorkflow workflow = client.newWorkflowStub(MoneyTransferWorkflow.class, options);

        // Configure the details for this money transfer request
        String referenceId = UUID.randomUUID().toString().substring(0, 18);
        String fromAccount = "A1001";
        String toAccount = "B2002";
        int amountToTransfer = 100;
        TransactionDetails transaction = new CoreTransactionDetails(fromAccount, toAccount, referenceId, amountToTransfer);

        // Perform asynchronous execution
        WorkflowExecution we = WorkflowClient.start(workflow::transfer, transaction);

        System.out.printf("Initiating transfer of $%d from [Account %s] to [Account %s].\n",
                          amountToTransfer, fromAccount, toAccount);
        System.out.printf("[WorkflowID: %s] [RunID: %s] [Reference: %s]\n",
                          we.getWorkflowId(), we.getRunId(), referenceId);
    }
}
src/client.ts
import { Connection, Client } from '@temporalio/client';
import { moneyTransfer } from './workflows';
import type { PaymentDetails } from './shared';
import { namespace, taskQueueName } from './shared';

async function run() {
  const connection = await Connection.connect();
  const client = new Client({ connection, namespace });

  const details: PaymentDetails = {
    amount: 400,
    sourceAccount: '85-150',
    targetAccount: '43-812',
    referenceId: '12345',
  };

  console.log(
    `Starting transfer from account ${details.sourceAccount} to account ${details.targetAccount} for $${details.amount}`
  );

  const handle = await client.workflow.start(moneyTransfer, {
    args: [details],
    taskQueue: taskQueueName,
    workflowId: 'pay-invoice-801',
  });

  console.log(
    `Started Workflow ${handle.workflowId} with RunID ${handle.firstExecutionRunId}`
  );
  console.log(await handle.result());
}

run().catch((err) => {
  console.error(err);
  process.exit(1);
});
transfer.php
<?php

declare(strict_types=1);

namespace App\Worker;

use App\Banking\PaymentDetails;
use App\Workflow\MoneyTransfer;
use Temporal\Client\GRPC\ServiceClient;
use Temporal\Client\WorkflowClient;
use Temporal\Client\WorkflowOptions;
use Temporal\Common\IdReusePolicy;
use Temporal\Exception\Client\WorkflowFailedException;

require_once __DIR__ . '/../vendor/autoload.php';

# Create client connected to server at the given address
$client = WorkflowClient::create(
    ServiceClient::create('127.0.0.1:7233'),
);

$paymentDetails = new PaymentDetails(
    sourceAccount: '85-150',
    targetAccount: '43-812',
    amount: 250,
    referenceId: '12345',
);

$workflow = $client->newWorkflowStub(
    MoneyTransfer::class,
    WorkflowOptions::new()
        ->withWorkflowIdReusePolicy(IdReusePolicy::AllowDuplicate)
        ->withWorkflowRunTimeout(20)
        ->withWorkflowExecutionTimeout(30),
);

try {
    $result = $workflow->handle($paymentDetails);
    echo "\e[32mResult: $result\e[0m\n";
} catch (WorkflowFailedException $e) {
    echo "\e[31mWorkflow failed: {$e->getMessage()}\e[0m\n";
} catch (\Throwable $e) {
    echo "\e[31mError: {$e->getMessage()}\e[0m\n";
}
MoneyTransferStarter/Program.cs
using Temporalio.Client;
using Temporalio.MoneyTransferProject.MoneyTransferWorker;

// Create a client to connect to localhost on "default" namespace
var client = await TemporalClient.ConnectAsync(new("localhost:7233"));

// Configure the money transfer details
var transferDetails = new TransferDetails
{
    SourceAccount = "A1001",
    TargetAccount = "B2002",
    Amount = 100,
    ReferenceId = "12345"
};

Console.WriteLine($"Starting transfer of ${transferDetails.Amount} from {transferDetails.SourceAccount} to {transferDetails.TargetAccount}");

// Start the workflow
var handle = await client.StartWorkflowAsync(
    (MoneyTransferWorkflow wf) => wf.RunAsync(transferDetails),
    new(id: $"money-transfer-{transferDetails.ReferenceId}", taskQueue: "MONEY_TRANSFER_TASK_QUEUE"));

Console.WriteLine($"Started workflow {handle.Id}");

// Wait for result
var result = await handle.GetResultAsync();
Console.WriteLine($"Workflow result: {result}");
starter.rb
require_relative 'shared'
require_relative 'workflow'
require 'securerandom'
require 'temporalio/client'

# Create the Temporal Client that connects to the Temporal Service
client = Temporalio::Client.connect('localhost:7233', 'default')

# Default values for the payment details
details = MoneyTransfer::TransferDetails.new('A1001', 'B2002', 100, SecureRandom.uuid)

# Use the Temporal Client to submit a Workflow Execution request
handle = client.start_workflow(
  MoneyTransfer::MoneyTransferWorkflow,
  details,
  id: "moneytransfer-#{details.reference_id}",
  task_queue: MoneyTransfer::TASK_QUEUE_NAME
)

puts "Initiated transfer of $#{details.amount} from #{details.source_account} to #{details.target_account}"
puts "Workflow ID: #{handle.id}"

# Keep running (and retry) if the Temporal Service becomes unavailable
begin
  puts "Workflow result: #{handle.result}"
rescue Temporalio::Error::RPCError
  puts 'Temporal Service unavailable while awaiting result'
  retry
end
This code uses a Temporal Client to connect to the Temporal Service, calling its workflow start method to request execution. This returns a handle, and calling result on that handle will block until execution is complete, at which point it provides the result.
Run Your Money Transfer
Now that your Worker is running and polling for tasks, you can start a Workflow Execution.
In Terminal 3, start the Workflow:
The workflow starter script starts a Workflow Execution. Each time you run it, the Temporal Server starts a new Workflow Execution.
temporal server start-dev
temporal server start-dev
temporal server start-dev
temporal server start-dev
temporal server start-dev
temporal server start-dev
temporal server start-dev
python run_worker.py
go run worker/main.go
mvn compile exec:java -Dexec.mainClass="moneytransferapp.MoneyTransferWorker" -Dorg.slf4j.simpleLogger.defaultLogLevel=warn
npm run worker
./rr serve
dotnet run --project MoneyTransferWorker
bundle exec ruby worker.rb
python run_workflow.py
go run start/main.go
mvn compile exec:java -Dexec.mainClass="moneytransferapp.TransferApp"
npm run client
php src/transfer.php
dotnet run --project MoneyTransferClient
bundle exec ruby starter.rb
Result: Transfer complete (transaction IDs: Withdrew $250 from account 85-150. ReferenceId: 12345, Deposited $250 into account 43-812. ReferenceId: 12345)
Starting transfer from account 85-150 to account 43-812 for 250 2022/11/14 10:52:20 WorkflowID: pay-invoice-701 RunID: 3312715c-9fea-4dc3-8040-cf8f270eb53c Transfer complete (transaction IDs: W1779185060, D1779185060)
Worker is running and actively polling the Task Queue. To quit, use ^C to interrupt. Withdrawing $62 from account 249946050. [ReferenceId: 1480a22d-d0fc-4361] Depositing $62 into account 591856595. [ReferenceId: 1480a22d-d0fc-4361] [1480a22d-d0fc-4361] Transaction succeeded.
Transfer complete (transaction IDs: W3436600150, D9270097234)
Result: Transfer complete (transaction IDs: W12345, D12345)
Workflow result: Transfer complete (transaction IDs: W-caa90e06-3a48-406d-86ff-e3e958a280f8, D-1910468b-5951-4f1d-ab51-75da5bba230b)
Initiated transfer of $100 from A1001 to B2002 Workflow ID: moneytransfer-2926a650-1aaf-49d9-bf87-0e3a09ef7b32 Workflow result: Transfer complete (transaction IDs: OKW-100-A1001, OKD-100-B2002)
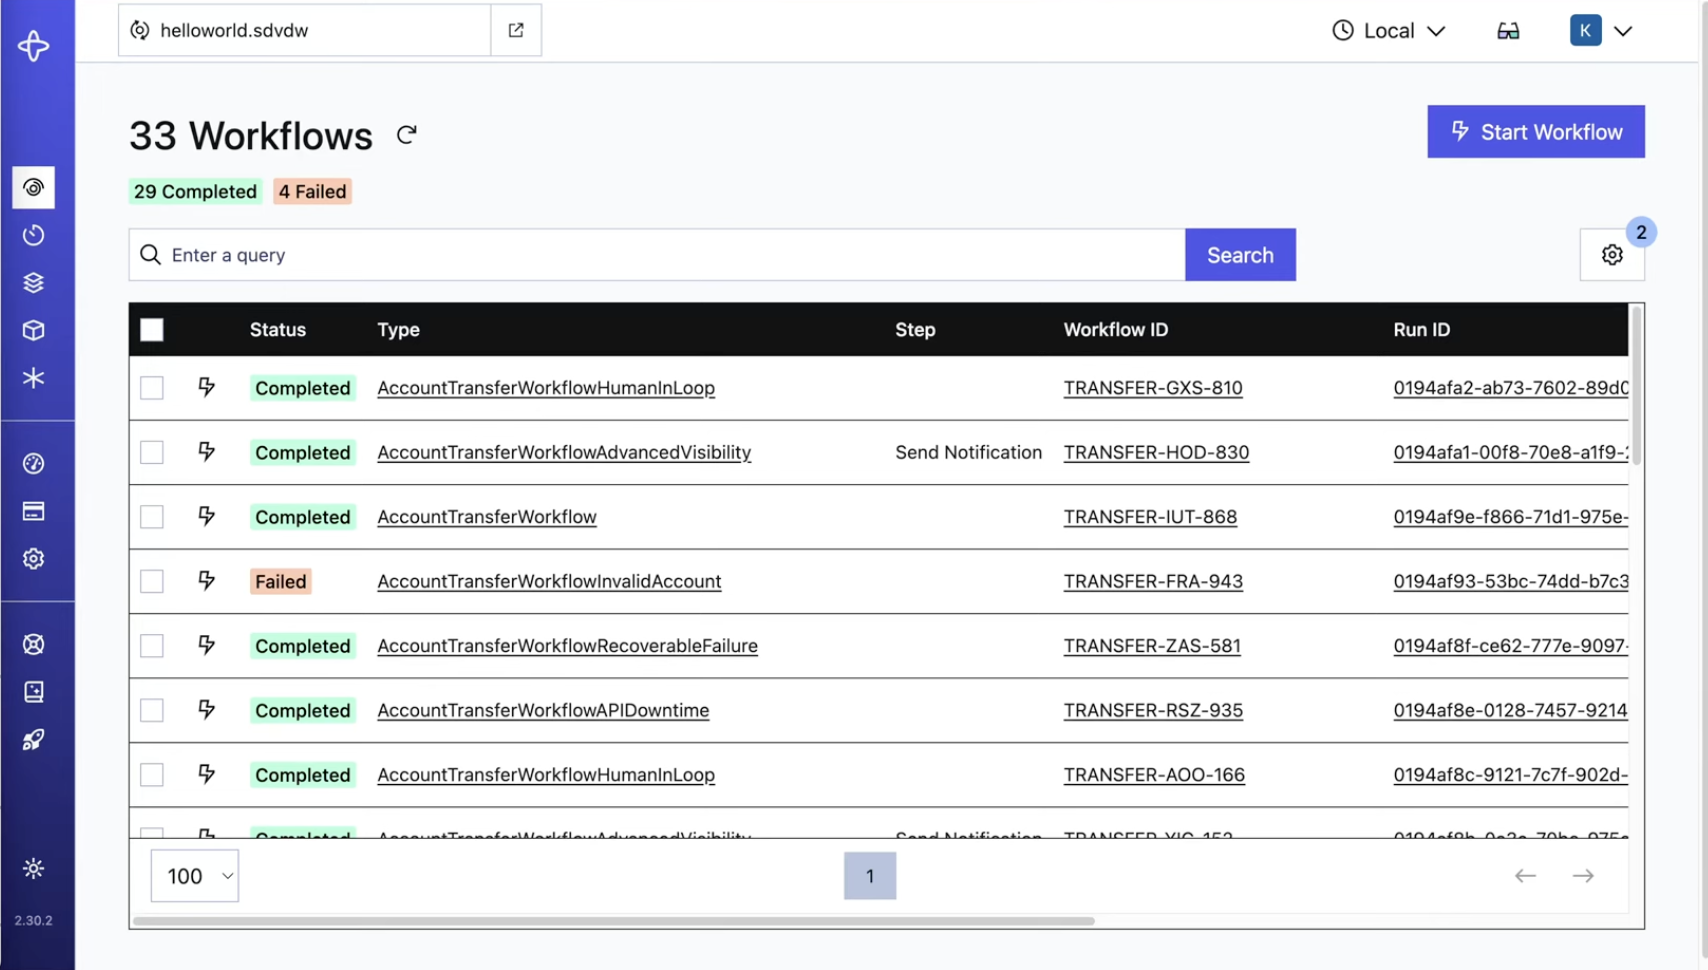
Check the Temporal Web UI
The Temporal Web UI lets you see details about the Workflow you just ran.
What you'll see in the UI:
- List of Workflows with their execution status
- Workflow summary with input and result
- History tab showing all events in chronological order
- Query, Signal, and Update capabilities
- Stack Trace tab for debugging
Try This: Click on a Workflow in the list to see all the details of the Workflow Execution.
Ready for Part 2?
Continue to Part 2: Simulate Failures